There’s something magical about a proper millefeuille. The first time I tasted one wasn’t in a fancy Paris patisserie, but in my grandmother’s kitchen in Lyon. I remember watching her hands—steady and confident—as she layered delicate sheets of homemade puff pastry with silky vanilla-speckled cream. “The secret,” she told me, gently pressing the final layer into place, “is patience.” Thirty years later, I still hear her words whenever I prepare this classic French dessert that literally translates to “a thousand leaves.” Let me guide you through creating this impressive pastry that’s been gracing French tables since the 17th century. ✨
The Art of Millefeuille: A Layered Masterpiece 🇫🇷
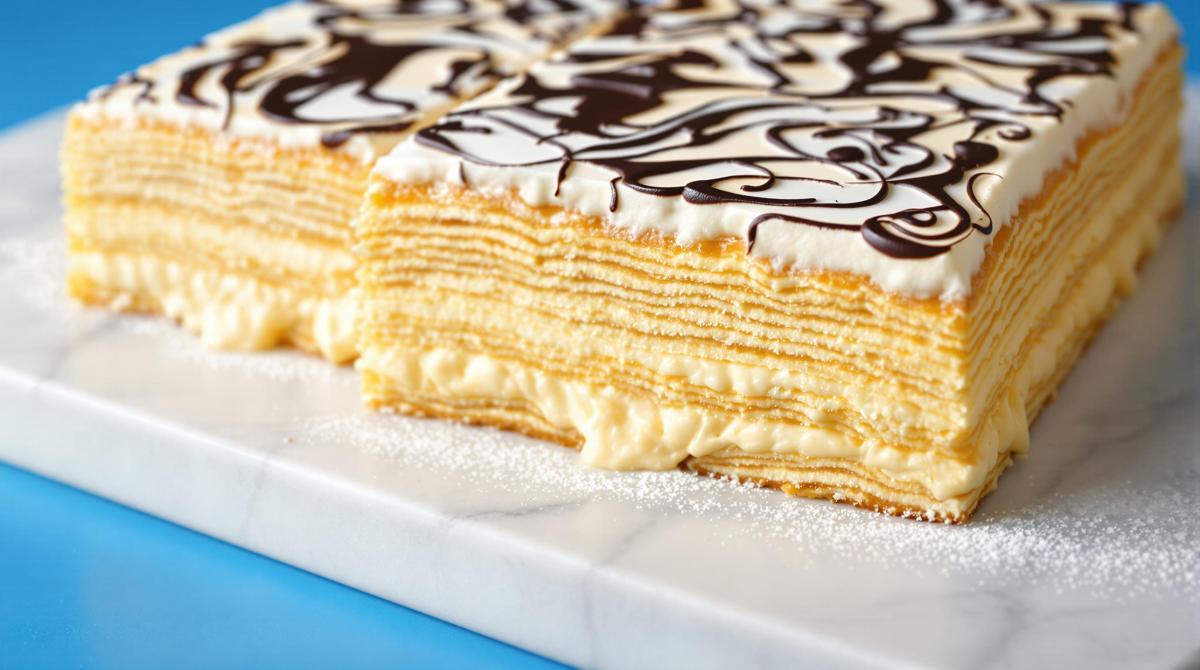
Millefeuille represents the perfect marriage of textures—crisp, shattering pastry against creamy, vanilla-rich filling. While many modern bakeries take shortcuts, the traditional version requires three components: properly laminated puff pastry, silky crème pâtissière, and a marbled glaze that’s as beautiful as it is delicious.
In Italy, you’ll find it called “mille foglie,” while Americans often know it as “Napoleon”—though this name likely has nothing to do with the French emperor, despite popular belief. The dessert predates Napoleon Bonaparte by nearly a century!
Essential Ingredients for Authentic Millefeuille 🧾
For the Puff Pastry:
• 1 pound (450g) all-butter puff pastry (homemade or high-quality store-bought)
For the Vanilla Pastry Cream:
• 4 large egg yolks
• ½ cup (100g) granulated sugar
• 3 tablespoons (23g) cornstarch
• 2 cups (480ml) whole milk
• 1 vanilla bean, split lengthwise and seeds scraped
• 1 tablespoon (14g) unsalted butter
• Pinch of salt
For the Classic Icing:
• 1 cup (120g) powdered sugar
• 2 tablespoons milk
• 2 ounces (57g) dark chocolate, melted (optional)
Chef’s Note: While store-bought puff pastry is acceptable, I encourage you to try making your own at least once. The difference in flavor and texture is remarkable. If using store-bought, look for all-butter varieties—they’re worth the extra cost.
Preparing the Perfect Pastry Cream 🍮
1. In a medium bowl, whisk together egg yolks, sugar, and cornstarch until pale yellow and slightly thickened.
2. In a saucepan, heat milk with vanilla bean seeds and pod until steaming (not boiling).
3. Tempering technique: Slowly pour about ⅓ of the hot milk into the egg mixture while whisking constantly. This gradually raises the temperature without scrambling the eggs.
4. Return the mixture to the saucepan with remaining milk and cook over medium heat, whisking continuously, until it thickens to a pudding-like consistency (about 2-3 minutes).
5. Remove from heat, strain through a fine-mesh sieve, and stir in butter and salt. Cover with plastic wrap directly on the surface (prevents skin formation) and refrigerate until completely chilled (at least 2 hours).
The Pastry: Creating Perfect Layers 🥐
1. Preheat oven to 400°F (200°C).
2. Roll puff pastry to about 1/16-inch thickness on a lightly floured surface. Cut into three equal rectangles.
3. Critical step: Dock the pastry thoroughly with a fork to prevent excessive rising. This creates the characteristic flat, crisp layers.
4. Place each piece between two sheets of parchment paper with a baking sheet on top to keep them flat. This weight prevents the pastry from puffing too much.
5. Bake for 15-20 minutes until golden brown and completely crisp. Cool completely on a wire rack.
Assembly: The Final Touch 🏗️
1. Place one pastry rectangle on a serving platter. Spread half the pastry cream evenly over it.
2. Top with second pastry layer, remaining pastry cream, and final pastry layer.
3. For the traditional marbled top: Mix powdered sugar with milk to create a thick white glaze. Spread over the top layer.
4. While still wet, drizzle melted chocolate in parallel lines, then run a toothpick perpendicular through the lines to create the classic marbled pattern.
5. Refrigerate for 1 hour to set before serving.
6. Critical cutting technique: Use a serrated knife dipped in hot water between cuts to prevent crushing the delicate layers.
Chef’s Secret: For extra stability when serving, refrigerate the assembled millefeuille for at least 4 hours before cutting. The pastry cream will slightly soften the layers, making it easier to slice cleanly.
This layered masterpiece pairs wonderfully with a light pavlova for contrast at a dessert buffet, or alongside a curated French cheese plate for an authentic French dining experience. If you enjoy traditional desserts, you might also love making traditional baklava or hearty oatmeal raisin cookies.
When I make millefeuille today, I still feel my grandmother’s presence guiding my hands. The beauty of this classic pastry isn’t just in its impressive appearance, but in how it connects us to generations of pastry chefs who came before. Take your time, embrace the process, and you’ll create a dessert that’s truly worth celebrating. After mastering this, you might be ready to tackle a hearty French beef Bourguignon for your main course next time!